
How to Replace the Water Pump Impeller on a Yamaha Outboard: A Step-by-Step Guide
, by RaylandLai, 4 min reading time
, by RaylandLai, 4 min reading time
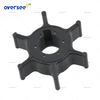
The water pump impeller is one of the most critical components of your Yamaha outboard’s cooling system. Made of high-quality rubber, these blades rotate at high speeds to pump cold water through the engine block. However, over time, they can become brittle, cracked, or "set," leading to overheating and potential engine failure.
In this guide, we’ll walk you through the process of replacing a standard Yamaha outboard impeller to keep your engine running cool.
Most marine technicians recommend replacing the impeller every 100 hours or once a year, whichever comes first. Even if you don't use your boat often, the rubber can degrade or lose its shape, especially if the engine has been sitting idle.
A New Impeller: Ensure you have the correct OEM or high-quality aftermarket part number for your specific Yamaha model (e.g., 6G1-44352-00).
Socket Set: Usually 10mm, 12mm, or 14mm depending on the horsepower.
Marine Grease: To lubricate the driveshaft and bolts.
Needle-nose Pliers: For removing the old woodruff key.
New Gaskets & O-rings: Included in a full water pump repair kit.
Shift into Neutral: Ensure the engine is in neutral before starting.
Disconnect the Speedometer Tube: If your model has one, carefully pull the small hose off the front of the lower unit.
Unbolt the Lower Unit: Remove the mounting bolts (usually 4 to 6 bolts) around the cavitation plate. Don't forget the "hidden bolt" often located under the trim tab (zinc anode).
Drop the Unit: Gently pull the lower unit downward. If it’s stuck, a few light taps with a rubber mallet should loosen it.
Locate the water pump housing on the top of the driveshaft.
Remove the four bolts holding the plastic or stainless steel housing in place.
Slide the housing up and off the driveshaft. You will now see the old impeller.
Slide the old impeller up the driveshaft.
Crucial Step: Locate the Woodruff Key (the small metal piece that locks the impeller to the shaft). Be careful not to lose it!
Inspect the wear plate and the outer cup inside the housing. If they are scored or burnt, replace them as well.
Clean the driveshaft and the mounting surface.
Apply a light coat of marine grease to the driveshaft and the inside of the new impeller.
Place the woodruff key back into its slot on the shaft.
Align the impeller groove with the key and slide it down.
The "Clockwise" Rule: Slide the housing back over the impeller while rotating the driveshaft clockwise. This ensures the rubber blades bend in the correct direction.
Tighten the housing bolts in a crisscross pattern.
Grease the splines at the top of the driveshaft (avoid putting grease on the very top face of the shaft to prevent hydraulic lock).
Reinstall the lower unit, reconnect the speedometer tube, and tighten all mounting bolts.
Test Run: Use "muffs" and a garden hose to start the engine. Check for a strong "tell-tale" stream of water exiting the back of the engine.
Always keep a spare impeller kit on board. It’s a small investment that can save you from an expensive tow or engine damage while out at sea.
Looking for high-quality replacement parts? We stock a wide range of Yamaha-compatible water pump kits and impellers designed for durability and perfect fitment. Check out our latest inventory [here].
Is there a specific Yamaha horsepower model (e.g., 15HP, 40HP, 150HP) that your customers ask about most often? I can help you refine the technical specs for those specific models.